
Printable Iron on Transfer Paper
Iron-on transfer paper lets you print a design at home and press it onto fabric. The most common mistakes happen before you ever pick up the iron: forgetting to mirror the image for light-fabric paper, printing at the wrong size, or wasting a sheet on one small design. This helper sizes, mirrors and lays out your design for printing at exact size.
- Free to use
- No sign-up
- Runs in your browser
Iron-on transfer layout tool
Iron-On Transfer Planner Pack
Printable iron-on planning sheets: placement and size guide, T-shirt mock-up templates, a pressing checklist and a project log with paper, temperature and timing notes.
- Placement guide (PDF)
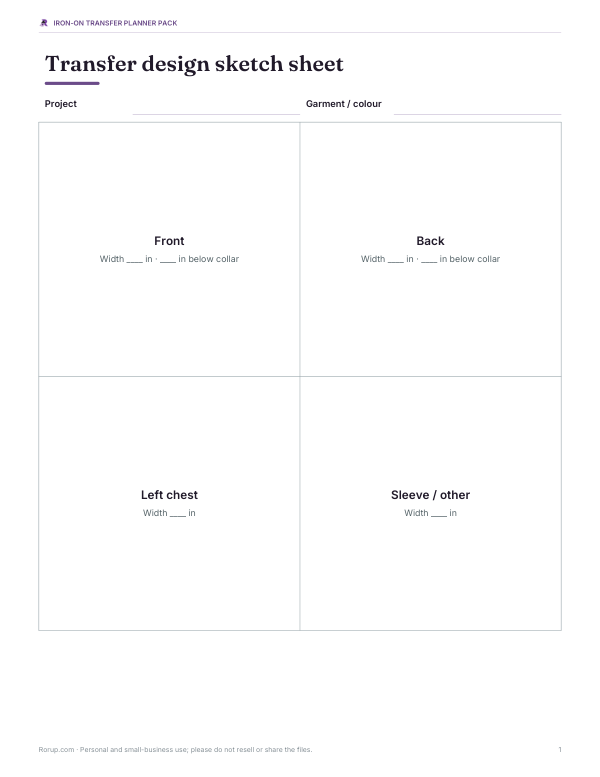
- Design sketch sheet (PDF)
- Pressing checklist (PDF/DOCX)
- Project log (PDF/DOCX/XLSX)
Formats: PDF, DOCX, XLSX. Instant download after payment (link valid 72 hours, up to 5 downloads). AI-assisted: the templates were drafted with AI help and reviewed and laid out before publishing.
$5.00 USD, one-time 4 files · about $1.25 each
- Instant download
- 7-day refund
- Secure checkout by Stripe
7-day money-back guarantee. Full refund within 7 days of purchase, even after you download.
Free sample: Design Sketch Sheet (PDF, 61 KB)
Full refund within 7 days — see the refund policy and license.
Free printables
Single sheets you can print right now, no sign-up. The full pack adds every sheet in one download plus the editable files.
 Printable Iron-On Project Log
Light-fabric vs dark-fabric transfer paper
| Light-fabric paper | Dark-fabric paper | |
|---|---|---|
| Use on | White and light-coloured fabric | Black, dark and bright fabric (also works on light) |
| Mirrored | Normal (not mirrored) | |
| Apply | Face down, iron on the backing, peel | Peel the backing first, place face up, cover and iron |
| White areas | Transparent — show the fabric colour | Printed white — opaque |
| Feel | Thinner, softer | Thicker film |
| Trimming | Trim close; clear film may show slightly | Trim exactly to the design edge |
Always check the instructions on your specific paper — some light-fabric papers are designed to be applied face up and are printed normally. The helper labels each sheet with its orientation so you can check before pressing.
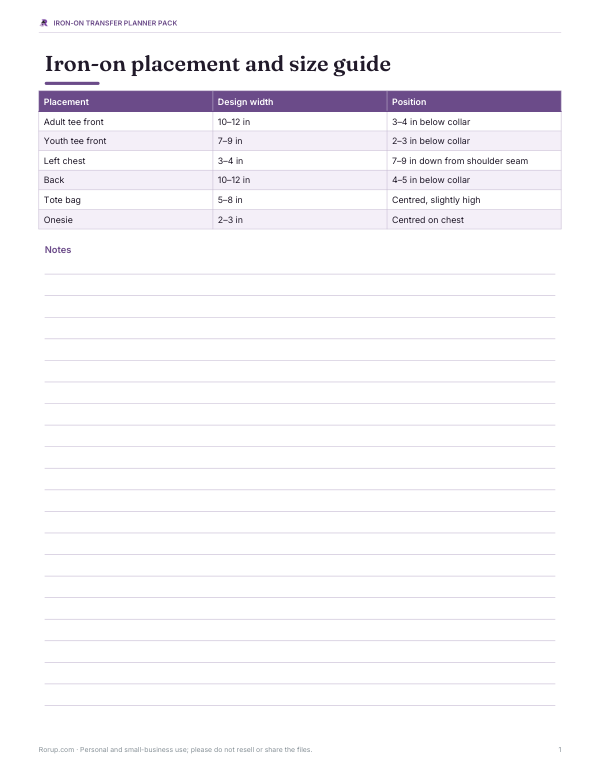
Common placement sizes
| Placement | Typical design width | Position |
|---|---|---|
| Adult T-shirt front | 10–12 in (25–30 cm) | About 3–4 in below the collar |
| Youth T-shirt | 7–9 in | About 2–3 in below the collar |
| Left chest logo | 3–4 in | About 7–9 in down from the shoulder seam, centred over the left chest |
| Back of shirt | 10–12 in | About 4–5 in below the collar |
| Tote bag | 5–8 in | Centred, a little above the middle |
| Baby onesie | 2–3 in | Centred on the chest |
Standard transfer paper is Letter or A4, so the largest single design is about 7.8 × 10.3 inches; for larger designs, split the design or use tabloid-size paper if your printer supports it.
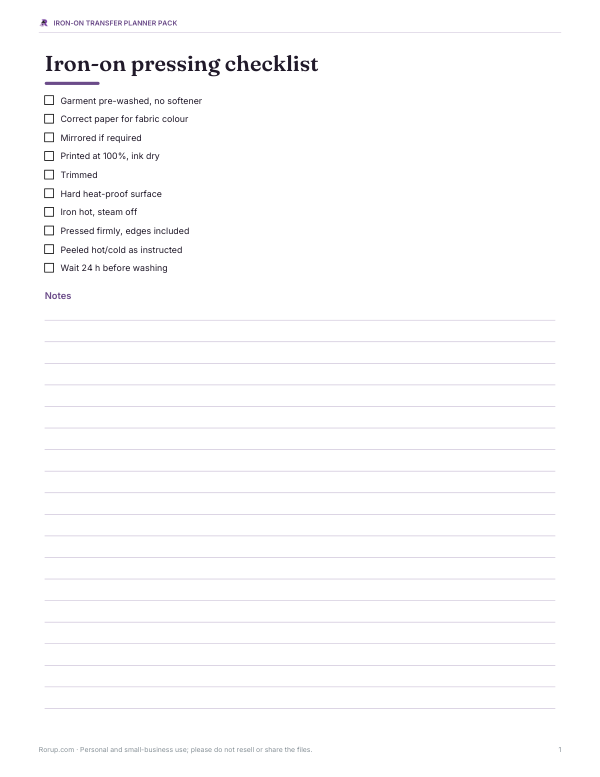
How to apply an iron-on transfer
- Pre-wash the garment without fabric softener and iron it flat and dry.
- Print the design at 100% scale on the correct side of the paper, and let the ink dry.
- Trim around the design, leaving a small border or cutting close depending on the paper.
- Use a hard, heat-resistant surface — not an ironing board, which is too soft.
- Set the iron to the temperature the paper recommends, usually the hottest dry setting, with steam off.
- Press firmly, moving slowly over the whole design for the time on the instructions, paying extra attention to edges.
- Peel hot or cold as the paper instructs.
A heat press gives more even heat and pressure than a household iron, but many people get good results with an iron by working slowly and pressing hard.
Worked example: team shirts
A coach wants “Team Rivera 2026” on the front of eight white T-shirts, 10 inches wide. The text is about 1.5 inches tall at that width — too wide to lie across a Letter sheet — so the helper turns it sideways to run down the page and fits four copies side by side: two sheets for eight shirts. Because the shirts are white, the coach uses light-fabric paper, and the helper mirrors the text so it reads correctly once pressed. Printing a test copy on plain paper first and holding it against a shirt confirms the size looks right.
Getting good print quality
- Use images of at least 200–300 pixels per inch at the print size; the helper warns if yours is lower.
- Choose the printer setting for the paper type or “best” quality; don’t use economy mode.
- Inkjet transfer paper is for inkjet printers and laser paper for laser printers — using the wrong type can damage the printer.
- Bright, saturated colours transfer better than pale pastels.
- On light-fabric paper, white areas don’t print — they show the fabric colour.
Washing and care
- Wait at least 24 hours before the first wash.
- Turn garments inside out and wash in cold or warm water on a gentle cycle.
- Avoid bleach and fabric softener.
- Tumble dry low or hang dry; never iron directly on the transfer — iron inside out or with a cloth over it.
- Expect some fading over many washes; heat transfer vinyl or screen printing lasts longer for heavy use.
Troubleshooting
| Problem | Likely cause and fix |
|---|---|
| Text reads backwards on the shirt | Light-fabric paper printed without mirroring — reprint mirrored |
| Edges peel after washing | Not enough heat or pressure at the edges; press longer on a hard surface |
| Cracking | Stretch fabric or over-washing hot; wash inside out, cool |
| Faded or dull colours | Low-quality print setting or wrong paper side |
| Shiny halo around the design | Excess film on light paper; trim closer to the design |
Fabric choices
Cotton and cotton-polyester blends accept transfers best. Very stretchy fabrics can crack the transfer film, and heat-sensitive materials such as nylon, acrylic and some polyesters may melt at iron temperatures. Test on a hidden area or scrap first.
Privacy
Your images and text stay in your browser. Nothing is uploaded; the print sheet is generated on your device.
Frequently asked questions
Do I need to mirror the image for iron-on transfer paper?
For most light-fabric papers, yes. For dark-fabric papers, no.
What size should a T-shirt transfer be?
About 10–12 inches wide for an adult front, 3–4 inches for a left-chest logo.
Can I use iron-on transfer paper on dark shirts?
Yes, with dark-fabric paper, which has an opaque white backing.
Can I use an ironing board?
It’s better to use a hard, heat-resistant surface so you can apply enough pressure.
How long do iron-on transfers last?
With gentle washing, many wash cycles, though they gradually fade and can crack.
Is my image uploaded?
No. It stays in your browser.
Can I print several small designs on one sheet?
Yes — set the copies and the helper fits as many as possible per sheet with trim lines.